
The routine EEG recording consists of the routine calibration, specific montage selections, activation techniques, other physiological measures and adapting to the recording at hand.
In this topic the routine procedures are derived from the national and international guidelines providing best practice recommendations. There will be differences from workplace to workplace, however the basic principles should be the foundation of all EEG recordings in any workplace in Australia. Following national or international guidelines to perform an EEG allows the interchange of information easily.
Variations to the routine procedure will also be discussed in the following topic – Topic 5 Altering from the Routine Test Conditions.
Performing the routine EEG
An EEG should follow a specific regime with the ability to adapt where necessary. By setting up a routine procedure we can become comfortable with the procedure in order to allow more time to care for your patient during the recording. You can also react quicker in instances that require instant action.
The features in your routine procedure should consist of:
- calibrations and machine checks
- the length of the recording
- machine settings
- montage choice
- activation procedures
Routine calibrations
As mentioned in the previous lesson we have discussed the calibration for digital EEG recorders at a routine level.
It is important to record a small segment of calibration, say 10 seconds, with each EEG not only to be sure your equipment is functioning well but for future reference to this particular EEG. It is not unusual for recording equipment and current software programs to go out of date over a period of only a few years. By attaching the calibration signal to the EEG, the reader can see the sensitivity and filter settings and judge the centring and alignment to that recording without having to access the initial software program. The calibration is an essential part of interpreting the EEG.
Often, for historical reasons, the sensitivity of the recording is labelled on the EEG recording using the unit of measure uV/mm. On review of the EEG the mm unit of measure is likely to be inaccurate and can alter depending on what monitor you are reviewing the recording. By having the calibration signal with the known input value available, the reader can get a clear visual representation of amplitude.
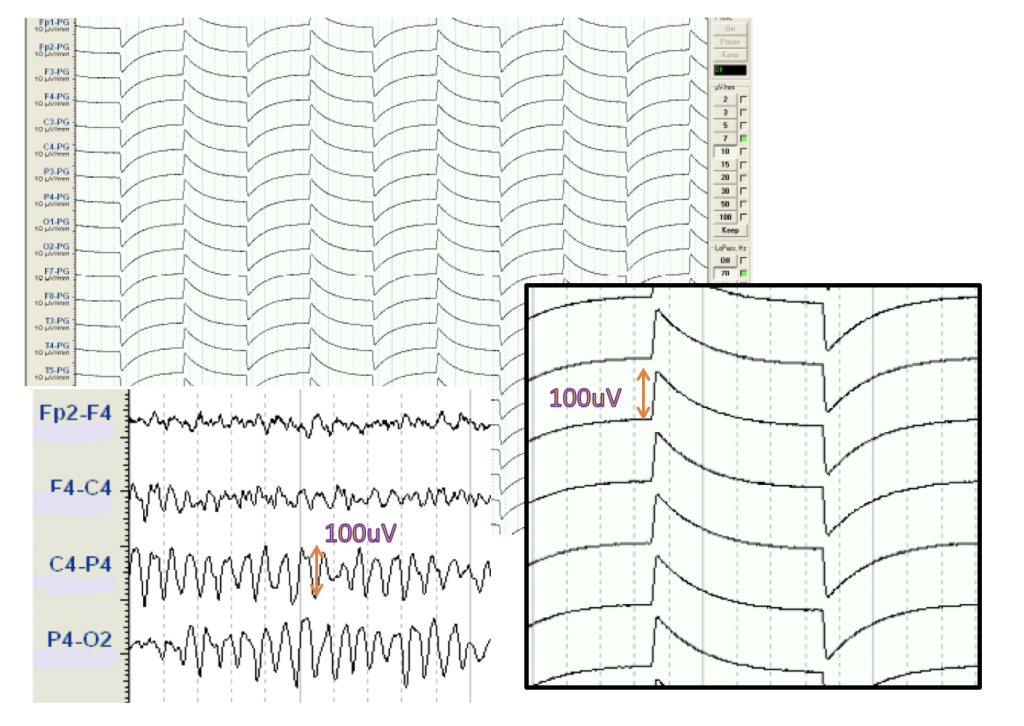
The example above shows the size of a calibration signal with the value of 100uV. From this visual representation we can have a good understanding of the amplitude of the recorded EEG signal.
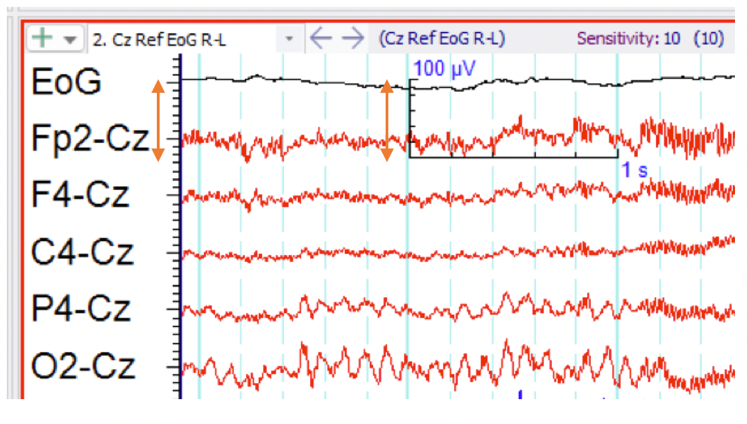
In this example we can see the amplitude scale for 100uV in the scale key does not match the divisions represented on the side of the montage descriptors. A reference to the calibration input is the most accurate representation of amplitude.
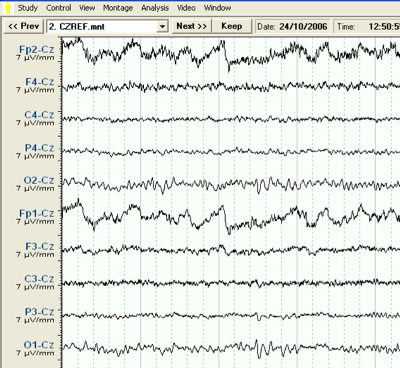
In the example above, the software has listed the unit of sensitivity as 7uv/mm under each electrode pair label. It can be almost guaranteed that 1mm does not truly represent 7uV for the reader of this text. Without the calibrated scale, it is impossible to measure the amplitude of the EEG signals in this sample.
Recording Parameters
Typically the waveforms you need to look at in the EEG lie in the bandwidth of 0.5 and 40Hz. The recording parameters chosen on the EEG recorder and display system play a large part in the ability to recognise this activity. In this topic the routine settings and the practical use of filters, sensitivity and display speeds are outlined. The principles behind these settings are covered in detail in the ANSA Learning short course Neurophysiology Amplifiers, Filters & Output. You may like to review this course before continuing.
It is important to recognize the difference between the recording parameters and the parameters used for display. EEG recording machine specifications will list the recording parameters that are used to record the raw data before display sensitivities and filters are applied. These values indicate the range of signals available to work within.
Example of a typical EEG with routine machine settings.
Sensitivity: 7
Low Pass: 70
High Pass: 0.5
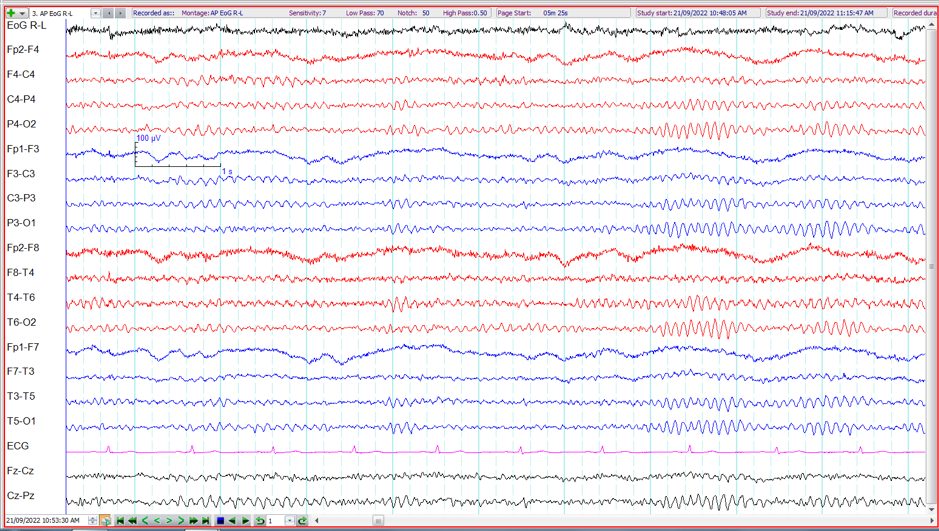
The sensitivity is set at ‘7’ with the assumed unit of measure being uV/mm from the analogue EEG recording nomenclature. While this is not an accurate form of measurement scale on the digital display systems because of screen size and display variations, in conjunction with the measurement scale depicting 100uV divisions, the sensitivity setting can be chosen appropriately for the size of the waveforms expected. The more accurate way to label the sensitivity would be 7uV/division.
The filter settings, Low Pass (High Frequency Filter HFF) 70Hz and High Pass (Low Frequency Filter LFF) 0.5Hz allow for the slow eye movement frequencies as well as faster beta activity and all frequencies in between.
The time display setting is not shown on the example above but from the 1 second measurement scale provided, 10 seconds per page are deducted.
Sensitivity settings
Sensitivity is the ability for the machine to display the waveform at a particular size. AS previously discussed, sensitivity is the relationship between the input signal and the deflection size of the display. (For more detail explanation refer back to the ANSA Learning short course Neurophysiology Amplifiers, Filters & Output.)
The sensitivity can be adjusted to suit the needs of the recording. This allows clearer viewing of particular activity and often depends on the age of the patient, as well as the recorded features themselves. Sensitivity should only be limited to the dynamic range of the recording channel. Knowing the limits of the recording apparatus and it’s capabilities to record as much of the signal undistorted as possible before the sensitivity setting is altered is important. The ability to adjust the sensitivity within the recorded signal range after the recording has taken place is a very welcome advancement from the analogue recording apparatus originally used to record EEGs.
Typically the sensitivity will begin at 70uV per division for and adult EEG and at 100uV per division for a paediatric EEG with alterations made as needed during the EEG.
Filter settings
A good analogy of filters is to think of a double sided sliding window. Each end of the window can be adjusted depending on the choice of filters. As mentioned above, the bandwidth for EEG activity is between 0.5-40Hz. The recording window must wide enough to allow these frequencies in. There are times when it is helpful for certain frequencies to be excluded, so one end or both ends of the window can be reduced according to the filter selection. Filters have a cut-off point where there is a guaranteed amplitude measurement for at least 70.7% raw signal of a particular frequency. With this knowledge the technologist/scientist can pick and choose which frequencies to display without too much distortion, and which frequencies can be attenuated.
However, before such selections are made, the technologist/scientist must be sure the recording apparatus has its window wide enough to cover the variables they would like access within the display. With digital recording apparatus the ability to adjust the filters within the recorded bandwidth after the recording has taken place is possible. This has changed the way EEGs are recorded and has been a welcome advance in technology.
In order to record EEG activity the filter bandwidth is set at 0.5 – 70Hz. In other words the low frequency filter is set at 0.5Hz and the high frequency filter is set 70Hz. Frequencies within this bandwidth are guaranteed to be at least 70.7% of their true amplitude and those outside this bandwidth are attenuated.
Display speeds
The speed at which you see the recording along the page (or screen) is heavily related to the frequency of the waves you are measuring and how they are viewed. By adjusting the display speeds you can enhance or inhibit particular activity.
Typically the routine display speed on a digital EEG apparatus is set at 10 seconds per page (screen view). This allows for easy measurement, or counting, of the frequencies within the EEG range.
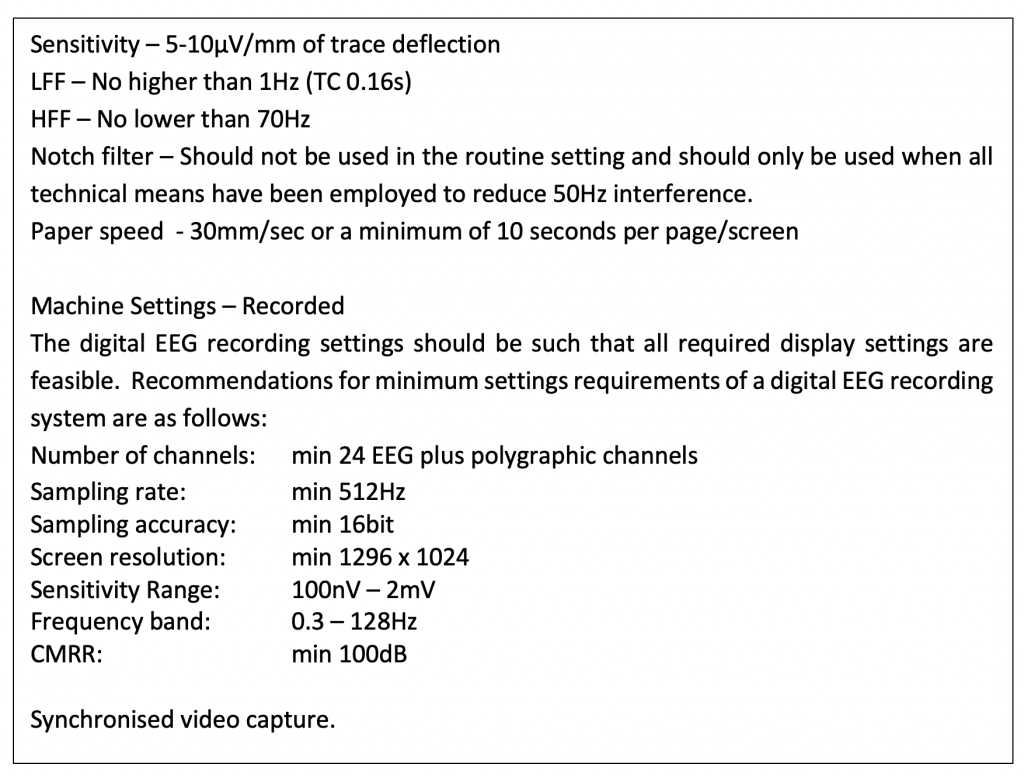
Recommended EEG recording settings.
According to the Association of Neurophysiology Scientists of Australia Inc. (ANSA) Routine EEG GuidelinesV2 2023 section 6(v) recommend the routine EEG be recorded with the following parameters.
Montage selection
A ‘montage’ is a particular pattern of derived electrodes. By having different montages available the EEG can be presented with the most possible information. The combination of a number of montages should be used in the routine EEG. This ensures complete coverage of the head and different representations of the EEG waveforms.
The routine EEG should comprise of at least two to three different montages to get a full coverage of all head regions. Even though the digital recording apparatus allows for re-montaging after the recording, it is important to have a good understanding of the EEG during the recording to ensure you are capturing as much information as possible. Some activity may only be clear with a particular montage.
Typical minimum routine montage sets would look something like
Calibration to begin the recording
All channel check to a common reference
Anterior – Posterior serial bipolar montage (aka double banana)
Transverse serial bipolar montage
Common reference, Average or Source reference
Anterior – Posterior serial bipolar montage for activation procedures
Calibration to complete the recording
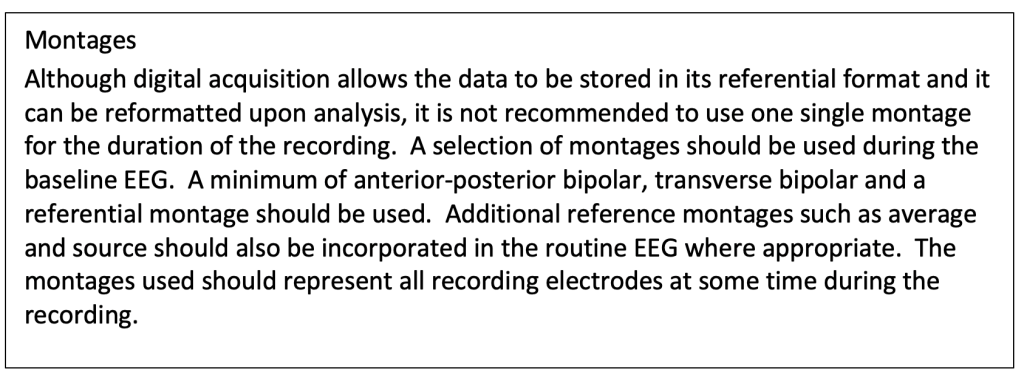
Recommended Montages for EEG recording.
The Association of Neurophysiology Scientists of Australia Inc. (ANSA) Routine EEG Guidelines V2 2023 section 6(iii) provides recommendation for the routine EEG montages.
Montage design and derivation types will be covered in more detail in the ANSA Learning short course Montages and Derivations (as at Sept 2026 availability TBA).
Activation procedures
Incorporated in a routine EEG are activation techniques. These include eye opening and closure, hyperventilation and photic stimulation. Other activation techniques may include tactile stimulation and loud noises (for sleep stage activation or reflex epilepsies).
Eye Opening and Closing
Eye opening and closure plays an important role in assessing the alertness of the patient as well as identifying one of the main ‘normal’ rhythms, the alpha rhythm. While it is desirable to record most of the EEG with the patient lying quietly and eyes closed, brief periods of eye opening is also helpful. In a routine EEG it is usual to record 3 or 4 periods of eye opening for say 10 seconds at a time. This is often done at the beginning of the recording before the patient is left to lie quietly for the remainder of the recording to encourage drowsiness or sleep.
Drowsiness and sleep
Drowsiness and sleep also act as an activation for EEG abnormalities. Sleep is encouraged at all times and in many cases patients are asked to arrive sleep deprived to promote sleep. There are specific conditions where sleep is required to be able to confirm the diagnosis such as Self Limited Epilepsy with Centro-Temporal spikes (SeLECTs), Landau Klefner Syndrome or Electrical Status Epilepticus in Slow Wave Sleep (ESESS).
Sleep deprivation
Sleep deprivation is the act of deliberately depriving the patient of sleep. Recommended sleep deprivation protocols for adults would include only having 4 hours sleep the night before, or for children, 4 hours less sleep than usual the night before the EEG recording. The patient should be instructed not to take stimulants prior to the EEG such as caffeinated drinks, and they should be reminded of the dangers of driving while sleep deprived.
Although there are numerous types of activation for the EEG there are two specific techniques that are routinely preformed during the EEG. Hyperventilation and Photic Stimulation are relatively simple and yield the highest response.
- Hyperventilation adjusts the blood gases to the brain to create a “stress-test” effect. It is well known that abnormalities may be enhanced during this procedure.
- Photic stimulation may induce epileptic features as well as highlight specific occipital normal patterns.
Routinely, Hyperventilation is performed for 3 minutes with at least 1to 2 minute rest period after the exercise.
Photic stimulation is performed using a range of different strobe light frequencies from 1-50Hz with the patient’s eyes opened and closed.
Both activation techniques require a certain amount of care considering the effects they can have on the patient. More detail on these activation techniques will be covered in ANSA Learning EEG Activation Procedures short course (as at Sept 2026 availability TBA)
Length of recording
Because the electrical signals from the brain are continually changing the EEG recording should cover a reasonable amount of time. Many abnormalities are intermittent and only appear in the EEG when a clinical episode occurs. Other abnormalities may be continuous or enhance with particular activation. The chance of recording an EEG feature of conditions such as epilepsy is directly proportional to the recording time.
The length of recording will depend on the expected outcome and resources available. While long term EEG studies have a higher chance of catching an abnormality and or episode of concern, the machine needs to be available, staff levels sufficient and inpatient service expense considered.
The national and international standards of best practice suggest the routine EEG recording should be a minimum of 20 minutes plus activation procedures.
The Association of Neurophysiology Scientists of Australia Inc. (ANSA) Routine EEG Guidelines V2 2023 section 6(iv) states “The routine EEG should be no less than 20 minutes of technically satisfactory recording with the addition of activation procedures where applicable.”
Additional time may need to be allowed if you are wanting to record sleep. Paediatric EEG recordings usually need extra time, particularly in the neonatal range. It is helpful to record the transition from one state to another in the little babies. Wakefulness through active and quiet sleep can take up to 60 mins in the newborn.
